Guide to Install and Changing a Tire on a Dirt Bike
Dirt Bikes are special bikes that are primarily built for off-road terrains. Physically appealing, fast, and tough, Dirt Bikes are lovely mechanical masterpieces. However, because of the conditions they are built for, Dirt Bikes are built tough. This is why working on its parts can be a little challenging.
Dirt Bike users (both regular riders and racers) love the traction they get when using a new Dirt Bike tire. Unfortunately, changing the tires of a Dirt Bike isn’t entirely a walk in the park. From loosening the rims’ nuts to removing the tube, things could be incredibly frustrating if not done the right way. Luckily for everyone, if you use the right tools and follow the simple steps we’ll share in this article, changing your Dirt Bike tire will be more comfortable.
Other Great Guides:
Tools for Changing A Dirt Bike Tire
To change your Dirt Bike tires with less challenges, you’ll need the following tools:
- A valve stem remover
- A dead-blow hammer
- A talc-based baby powder
- A tire paste
- A pressure Gauge
- Tire spoons (at least two, but three or more could come in handy)
- A 12mm socket or wrench
- Motion Pro’s Bead Buddy
Having a tire stand could make your work much easier. However, it’s not mandatory. While we didn’t add gloves to the list above, using good safety gloves is very important. Whether you’re a pro at changing a Dirt Bike tire or not, failure to use good safety gloves might give you bruised or bloody knuckles. While other tools you may have used before may come in handy, the tools listed above are the most important ones you’ll need.
Procedure for Changing The Tires Of A Dirt Bike
Once you’ve got all the tools listed above, then you’re good to go.
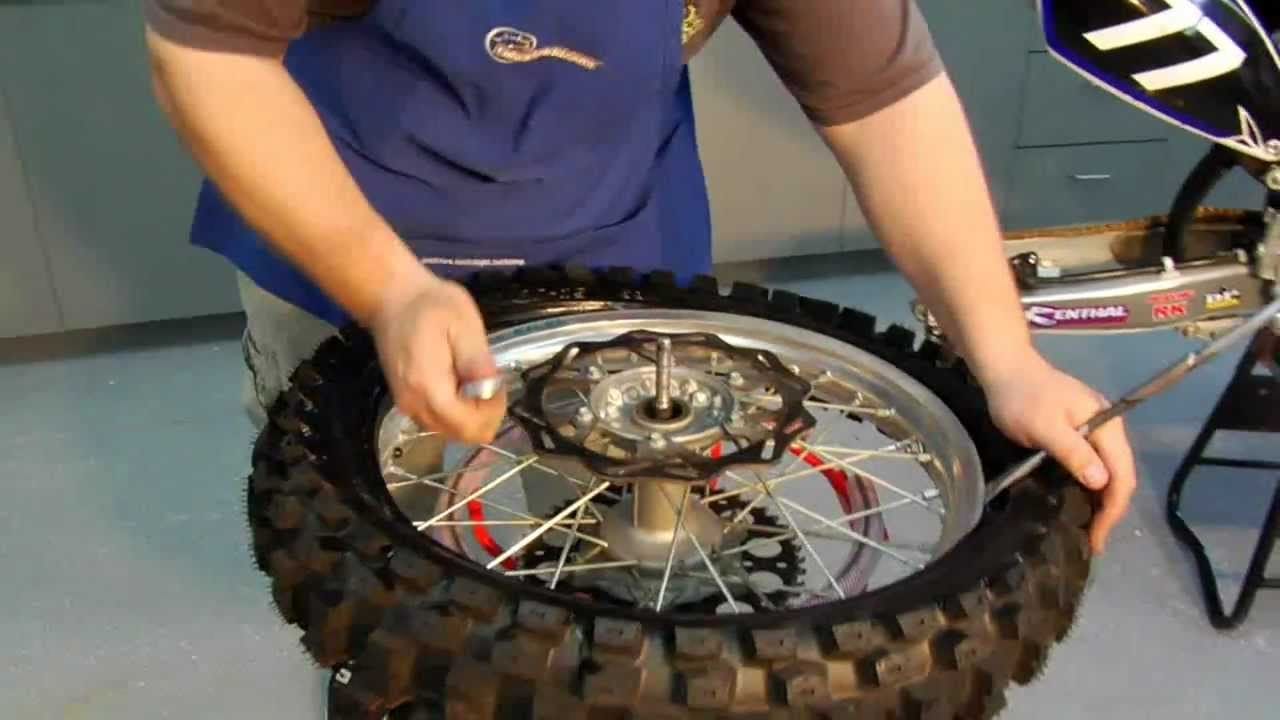
If you have a tire stand, mount your Dirt Bike tire on it. Ensure that the side of the wheel with the sprocket faces up. Loosen and completely take out the valve core of the tire. Ensure all the air is ejected from the tube. In case you don’t own a tire stand, you can improvise by using a folded towel (or a carpet) to protect the sprocket and disc from the ground.
Start loosening the nuts of the rim. Keep loosening until it remains just a few threads. Try observing if the nuts are bounded to the threads in any way. If they are, it could be that corrosion was already forming on it. Use some anti-seize or grease on the thread, and then tighten the lock of the rim.
After mounting your tire as instructed above:
- Use one of your tire spoons to remove the tire’s bead from the rim’s edge.
- Ensure the bend in on the iron is downwards.
- Slide it beneath the rim’s edge.
- Utilize the iron’s shape and any other available leverage to push the bead down.
- Do this around the entire rim.
Removing Your Old Tire
- After breaking the bead around the sprocket side, flip the rim to make the disc side face upwards. Break the bead on the disc side across the entire rim. Using your hands, apply some pressure on the tire to ensure the bead around the rim is completely broken on both sides. After that, apply pressure on the nut you see on the lock bolt to force the inwards towards the tire’s well. If the rim lock is jammed, you can use a flat iron to push the rim lock downwards.
- Use one hand to hold down the bead of the tire. Pick up a tire spoon and slide it in between the rim and the tire such that the spoon goes inwards towards the well of the tire. While the tire spoon is in position, lever some portion of the tire such that the tire’s edge protrudes out of the rim. Push the tire spoon correctly into position (i.e., beneath the disc to hold it in place).
- The goal is to repeat the step above till all portions of the tire protrude out above the rim. To do this, you’ll need another tire spoon. Put the second tire spoon into the portion of the tire that’s already protruding. Keep moving the second tire spoon is gradually away from the first. You can move it in short distances of 2 to 3 inches to ensure it’s easy to push out the tire from beneath the rim. Ensure that as you move the tire spoon, the portion of the tire you’re moving through is equally protruding out above the rim. Remember, moving the second tire spoon long stretches at a go may make it tougher to push out the tire from the rim. It would be best if you kept to short distances. If you have three tire spoons, they might all come in handy here.
- Once you’re done with making one side of the tire protrude, take the valve off the rim and then start pulling out the tube from the tire. This can be a little tough. However, anyone with average strength should be able to do this without breaking much sweat.
- Try reinstalling the valve immediately you take out the tube to make sure it is fit for reinstallation. There’s also the added advantage of not losing it by letting it lie around until it gets missing.
- After that, flip the rim towards the sprocket side. The goal is to also make the tire’s portion on the sprocket side be entirely above the rim.
- When the step above is completed, take the wheel off the tire stand. Hold it vertically upwards. Position it such that that the rim lock is on the part of the tire/wheel facing up. Bump the lower part of the tire (the bottom part) on the ground a few times. If you’ve bumped it correctly, the rim should fall into the tire’s well.
- Once the rim has collapsed into the well of the tire, it becomes easier to push off the rim and free the tire from it. If you’re using a standard tire stand, you can mount your tire on it and peel off the tire from the rim. Your tire should fall around the tire stand once it is completely peeled off the rim.
- If you’re using a bucket or some other improvised tire stand, the last instruction above might not be ideal. So, if you’re using an improvised tire stand, simply take the tire-wheel combo from the stand and keep it on the floor vertically upwards. Make sure the tire-wheel combo is placed firmly in a steady position. Use one hand to hold down the wheel and use the other to peel off the tire from it. To peel off the tire, push it away from yourself while holding the wheel firmly in place.
- After completing the step above, the next goal is to complete a simple inspection. The inspection aims to ensure no dirt or sharp edges on the rims or the spoke’s threaded ends. The presence of any of these may result in tube failure. There’s usually a rubber strip worn around the rim. While some riders discard the rubber strip, some tire technicians love to leave it as long as it isn’t severely damaged.
Installing the New Tire
- Now we’re done getting the old tire off the rim. The next thing on the to-do list should be to prepare the new tire we’ll use to replace the old one. To do this, you can start by pouring a talc-based baby powder into the well of the new tire. Rotate the tire to ensure the powder gets around the whole length of the tire’s well. The purpose of using the powder is to prevent the tube from rubbing against the tire. Too much chaffing could wear out the tube resulting in a tube failure not too long after installing the new tire. The talc-based powder will also offer slipperiness that’ll help minimize any potential damage to your tube while it is being inflated inside the well of the tire. Note: not all baby powders are talc-based powders. A lot of baby powders are now made from corn starch. While the cornstarch-based powders may be safer for babies, it is not an ideal replacement for talc-based baby powders. Cornstarch-based powders do not offer as much slipperiness as their talc-based counterparts. When changing your Dirt Bike tires, use a baby powder that has talc as one of its major ingredients.
- Put back the rim on the tire stand with the tire worn around it. The disc side should face up. Gradually fit the tube around the well of the tire. Make sure the tube is as smooth and straight as you possibly can. Ensure there are no folds or twists on the tube.
- Add a small volume of air into the tube. The amount of air should be just enough to allow the tube to don its circular shape. Too much air at this stage would result in problems when trying to fit the tire around the rim.
- Use a sponge to apply some tire paste. Avoid using any chemical. The use of chemicals could cause unwanted slipperiness while a rider rides the Bike. After applying the paste, put the valve stem on the rim. At this point, your tube is inside your tire.
- Your next goal is to use a tire spoon to redo the beads you broke and ensure the rims and tire are properly locked. Slide the tire spoon in a diagonal position such that the spoon pushes the wheel towards one direction while you use your hand to drag the tire on the rim. Keep doing this gradually as you drag bite-sized portions of the tire on the rim. You should be able to drag and cover the initial portions quite easily. The difficulty of covering the rim will increase as you get closer to completely covering the entire rim. Sometimes, you’ll likely have problems moving the spoon because it is easy to get trapped. The tube itself may also be trapped between the spoon, the rim, and the tire’s bead. If you find yourself in such a condition, move the spoon out gently to avoid rupturing the partially inflated tube. Even if the tube isn’t punctured immediately, going hard on the spoon while it is stuck between the tube and the rim could inflict future damages.
After completing the step above:
- Go over to the sprocket side of the rim.
- Press the rim lock against the tire (sides of the tire).
- Pick up your tire spoons and press down the rim lock.
- Work it in opposite directions (back and forth) to ease the tire on the rim lock.
- Keep the bead off the tire while pushing up the rim edges inside the tire. Ensure that the lock’s shoulders are in a position that is above the tire’s beads. Now release your grip on the tire and let it go back into place such that the rim edges fall inside the tire. Also, make sure that the inflated tube is positioned above the rim lock.
- Now flip the wheel-tire combo to such that the disc side faces up. Apply some soap or tire paste on the disc side. Grab two tire irons and slide them below the rim edges such that the tire irons pushes down vertically on the tire while appearing to push out the rim. The tire iron should ideally be placed around four inches apart. When the two tire irons are in place, grab and insert a Bead Buddy in a way that keeps the tire off the bead (and also keeps it down). It should preferably be around two inches from the valve.
- The next goal is to maneuver the tire to fit well. You can start by inserting the tire spoons. Make this a few inches apart. Push down on the new tire to keep the tire’s beads down while you take off the shoulders. When getting closer to the last six to eight inches, you may have to pull and push the tire to ensure that all portions of the bead are taken off the rim. If it gets tougher than you expected, you have to push the beads inside the well of the rim. If done correctly, working the last portions should be quite easy. If you still find it hard, you may still have to push down the tire more.
- To get a good job, you need to pay extra attention to the last few portions. Apply a lot of lube while working the last bites. Try lifting the tire iron until it is positioned parallel with the edges of the rim. Doing that will help prevent pinching the tube.
- Take out the Bead buddy from the tire. Set the tire’s pressure to around 12 to 14 psi. Depending on the conditions you’ll be riding your Dirt Bike, you can throw in a little more pressure. A rocky condition might need a few more psi than normal.
- Put back the valve cap, but don’t tighten the nut too much. Tighten the nut of the rim lock. Avoid tightening it too much as well.
Your Dirt Bike tires are now ready to De deployed.